
![]()
Why AD Enumeration
This network is the continuation of the Breaching AD network. Please make sure to complete this network before continuing with this one. Also, note that we will discuss AD objects extensively. If you need a refresher, have a quick reskim of this room. Now that we have our very first set of valid Active Directory (AD) credentials, we will explore the different methods that can be used to enumerate AD.
AD Enumeration
Once we have that first set of AD credentials and the means to authenticate with them on the network, a whole new world of possibilities opens up! We can start enumerating various details about the AD setup and structure with authenticated access, even super low-privileged access.
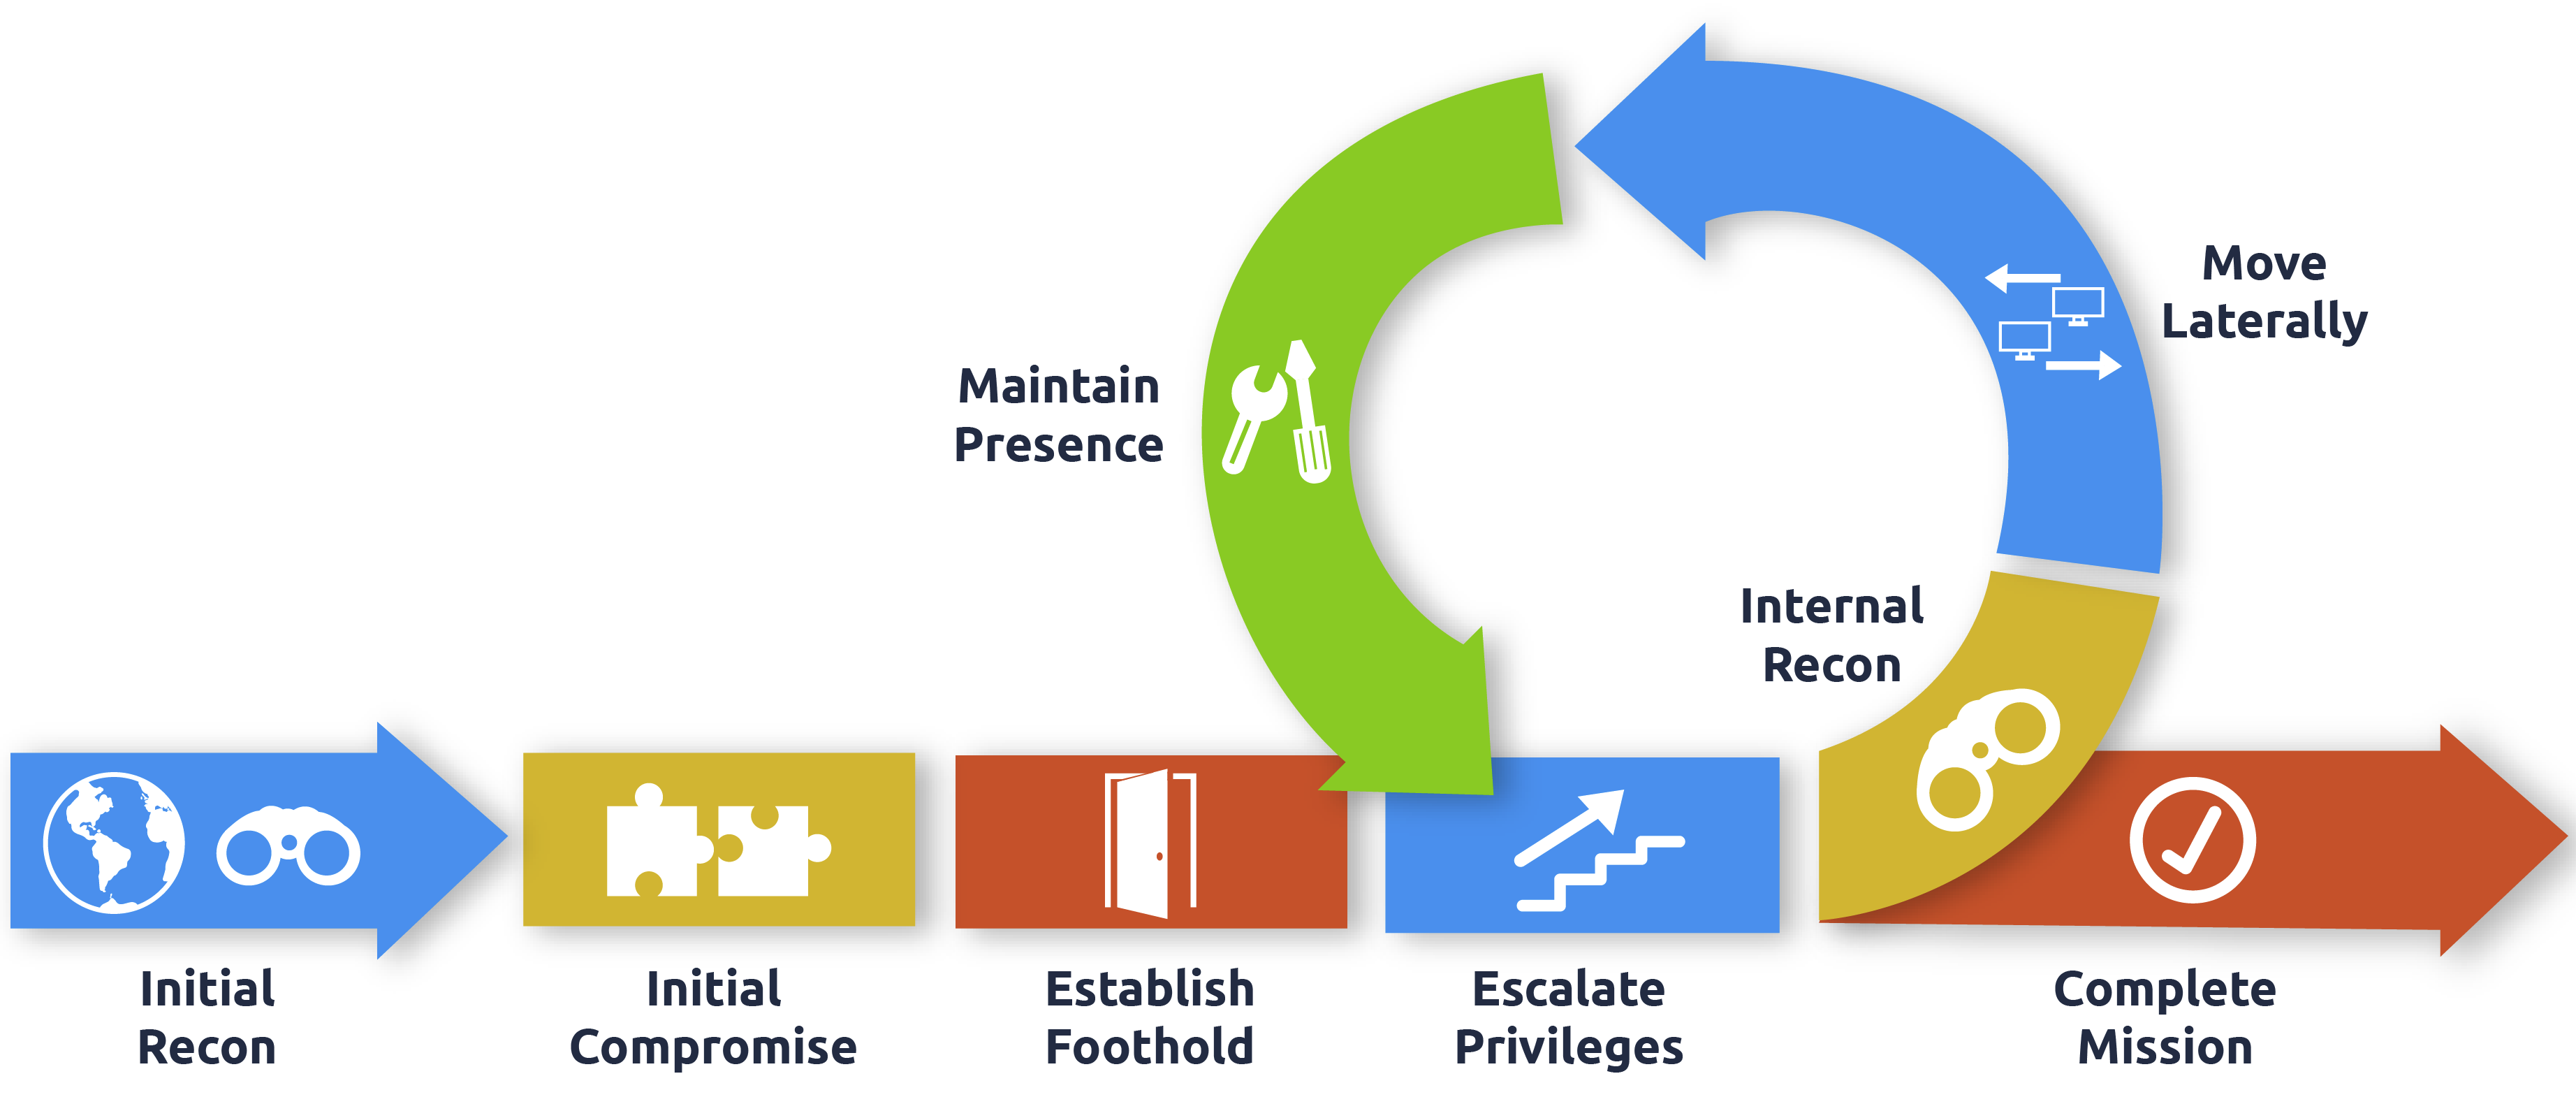
During a red team engagement, this will usually lead to us being able to perform some form of privilege escalation or lateral movement to gain additional access until we have sufficient privileges to execute and reach our goals. In most cases, enumeration and exploitation are heavily entwined. Once an attack path shown by the enumeration phase has been exploited, enumeration is again performed from this new privileged position, as shown in the diagram below.
Learning Objectives
In this network, we will cover several methods that can be used to enumerate AD. This is by no means a complete list as available methods are usually highly situational and dependent on the acquired breach. However, we will cover the following techniques for enumerating AD:
- The AD snap-ins of the Microsoft Management Console.
- The net commands of Command Prompt.
- The AD-RSAT cmdlets of PowerShell.
- Bloodhound.
Connecting to the Network
AttackBox
If you are using the Web-based AttackBox, you will be connected to the network automatically if you start the AttackBox from the room’s page. You can verify this by running the ping command against the IP of the THMDC.za.tryhackme.com host. We do still need to configure DNS, however. Windows Networks use the Domain Name Service (DNS) to resolve hostnames to IPs. Throughout this network, DNS will be used for the tasks. You will have to configure DNS on the host on which you are running the VPN connection. In order to configure our DNS, run the following command:
1
systemd-resolve --interface enumad --set-dns $THMDCIP --set-domain za.tryhackme.com
Remember to replace $THMDCIP with the IP of THMDC in your network diagram. You can test that DNS is working by running:
1
nslookup thmdc.za.tryhackme.com
This should resolve to the IP of your DC.
You should also take the time to make note of your VPN IP. Using ifconfig or ip a, make note of the IP of the enumad network adapter. This is your IP and the associated interface that you should use when performing the attacks in the tasks.
Other hosts
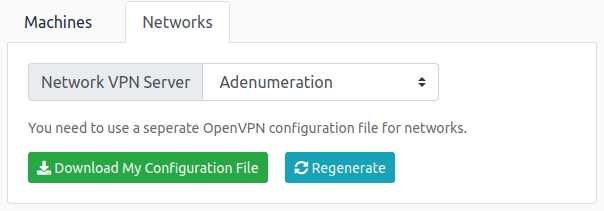
If you are going to use your own attack machine, an OpenVPN configuration file will have been generated for you once you join the room. Go to your access page. Select ‘EnumeratingAD’ from the VPN servers (under the network tab) and download your configuration file.

Kali
If you are using a Kali VM, Network Manager is most likely used as DNS manager. You can use GUI Menu to configure DNS:
- Network Manager -> Advanced Network Configuration -> Your Connection -> IPv4 Settings
- Set your DNS IP here to the IP for THMDC in the network diagram above
- Add another DNS such as 1.1.1.1 or similar to ensure you still have internet access
- Run
sudo systemctl restart NetworkManagerand test your DNS similar to the steps above.
Requesting Your Credentials
To simulate an AD breach, you will be provided with your first set of AD credentials. Once your networking setup has been completed, on your Attack Box, navigate to http://distributor.za.tryhackme.com/creds to request your credential pair. Click the “Get Credentials” button to receive your credential pair that can be used for initial access.
This credential pair will provide you RDP and SSH access to THMJMP1.za.tryhackme.com. THMJMP1 can be seen as a jump host into this environment, simulating a foothold that you have achieved. Jump hosts are often targeted by the red team since they provide access to a new network segment. You can use Remmina or any other similar Remote Desktop client to connect to this host for RDP. Remember to specify the domain of za.tryhackme.com when connecting. Task 2 and 3 will require RDP access.
1
Your credentials have been generated: Username: joel.pearce Password: E3IIDNiiT96
For SSH access, you can use the following SSH command:
1
ssh za.tryhackme.com\\<AD Username>@thmjmp1.za.tryhackme.com
When prompted, provide your account’s associated password. Although RDP can be used for all tasks, SSH is faster and can be used for Task 4, 5, and 6.
Credential Injection
Before jumping into AD objects and enumeration, let’s first talk about credential injection methods. From the Breaching AD network, you would have seen that credentials are often found without compromising a domain-joined machine. Specific enumeration techniques may require a particular setup to work.
Windows vs Linux
“If you know the enemy and know yourself, you need not fear the results of a hundred battles. If you know yourself but not the enemy, for every victory gained you will also suffer defeat.” - Sun Tzu, Art of War.
You can get incredibly far doing AD enumeration from a Kali machine. Still, if you genuinely want to do in-depth enumeration and even exploitation, you need to understand and mimic your enemy. Thus, you need a Windows machine. This will allow us to use several built-in methods to stage our enumeration and exploits. In this network, we will explore one of these built-in tools, called the runas.exe binary.
Runas Explained
Have you ever found AD credentials but nowhere to log in with them? Runas may be the answer you’ve been looking for!
In security assessments, you will often have network access and have just discovered AD credentials but have no means or privileges to create a new domain-joined machine. So we need the ability to use those credentials on a Windows machine we control.
If we have the AD credentials in the format of
1
runas.exe /netonly /user:<domain>\<username> cmd.exe
Let’s look at the parameters:
/netonly- Since we are not domain-joined, we want to load the credentials for network authentication but not authenticate against a domain controller. So commands executed locally on the computer will run in the context of your standard Windows account, but any network connections will occur using the account specified here./user- Here, we provide the details of the domain and the username. It is always a safe bet to use the Fully Qualified Domain Name (FQDN) instead of just the NetBIOS name of the domain since this will help with resolution.cmd.exe- This is the program we want to execute once the credentials are injected. This can be changed to anything, but the safest bet is cmd.exe since you can then use that to launch whatever you want, with the credentials injected.
Once you run this command, you will be prompted to supply a password. Note that since we added the /netonly parameter, the credentials will not be verified directly by a domain controller so that it will accept any password. We still need to confirm that the network credentials are loaded successfully and correctly.
Note: If you use your own Windows machine, you should make sure that you run your first Command Prompt as Administrator. This will inject an Administrator token into CMD. If you run tools that require local Administrative privileges from your Runas spawned CMD, the token will already be available. This does not give you administrative privileges on the network, but will ensure that any local commands you execute, will execute with administrative privileges.
It's Always DNS
Note: These next steps you only need to perform if you use your own Windows machine for the exercise. However, it is good knowledge to learn how to perform since it may be helpful on red team exercises.
After providing the password, a new command prompt window will open. Now we still need to verify that our credentials are working. The most surefire way to do this is to list SYSVOL. Any AD account, no matter how low-privileged, can read the contents of the SYSVOL directory.
SYSVOL is a folder that exists on all domain controllers. It is a shared folder storing the Group Policy Objects (GPOs) and information along with any other domain related scripts. It is an essential component for Active Directory since it delivers these GPOs to all computers on the domain. Domain-joined computers can then read these GPOs and apply the applicable ones, making domain-wide configuration changes from a central location.
Before we can list SYSVOL, we need to configure our DNS. Sometimes you are lucky, and internal DNS will be configured for you automatically through DHCP or the VPN connection, but not always (like this TryHackMe network). It is good to understand how to do it manually. Your safest bet for a DNS server is usually a domain controller. Using the IP of the domain controller, we can execute the following commands in a PowerShell window:
1
2
3
$dnsip = "<DC IP>"
$index = Get-NetAdapter -Name 'Ethernet' | Select-Object -ExpandProperty 'ifIndex'
Set-DnsClientServerAddress -InterfaceIndex $index -ServerAddresses $dnsip
Of course, ‘Ethernet’ will be whatever interface is connected to the TryHackMe network. We can verify that DNS is working by running the following:
1
C:\> nslookup za.tryhackme.com
Which should now resolve to the DC IP since this is where the FQDN is being hosted. Now that DNS is working, we can finally test our credentials. We can use the following command to force a network-based listing of the SYSVOL directory:
1
2
3
4
5
6
7
8
9
10
11
C:\Tools>dir \\za.tryhackme.com\SYSVOL\
 Volume in drive \\za.tryhackme.com\SYSVOL is Windows
 Volume Serial Number is 1634-22A9

 Directory of \\za.tryhackme.com\SYSVOL

02/24/2022  09:57 PM    <DIR>          .
02/24/2022  09:57 PM    <DIR>          ..
02/24/2022  09:57 PM    <JUNCTION>     za.tryhackme.com [C:\Windows\SYSVOL\domain]
               0 File(s)              0 bytes
               3 Dir(s)  51,835,408,384 bytes free
We won’t go too much in-depth now into the contents of SYSVOL, but note that it is also good to enumerate its contents since there may be some additional AD credentials lurking there.
IP vs Hostnames
Question: Is there a difference between dir \za.tryhackme.com\SYSVOL and dir \
\SYSVOL and why the big fuss about DNS?
There is quite a difference, and it boils down to the authentication method being used. When we provide the hostname, network authentication will attempt first to perform Kerberos authentication. Since Kerberos authentication uses hostnames embedded in the tickets, if we provide the IP instead, we can force the authentication type to be NTLM. While on the surface, this does not matter to us right now, it is good to understand these slight differences since they can allow you to remain more stealthy during a Red team assessment. In some instances, organisations will be monitoring for OverPass- and Pass-The-Hash Attacks. Forcing NTLM authentication is a good trick to have in the book to avoid detection in these cases.
Using Injected Credentials
Now that we have injected our AD credentials into memory, this is where the fun begins. With the /netonly option, all network communication will use these injected credentials for authentication. This includes all network communications of applications executed from that command prompt window.
This is where it becomes potent. Have you ever had a case where an MS SQL database used Windows Authentication, and you were not domain-joined? Start MS SQL Studio from that command prompt; even though it shows your local username, click Log In, and it will use the AD credentials in the background to authenticate! We can even use this to authenticate to web applications that use NTLM Authentication.
We will be using that in the next task for our first AD enumeration technique.
What native Windows binary allows us to inject credentials legitimately into memory?
runas.exe
What parameter option of the runas binary will ensure that the injected credentials are used for all network connections?
/netobly
What network folder on a domain controller is accessible by any authenticated AD account and stores GPO information?
SYSVOL
When performing dir \za.tryhackme.com\SYSVOL, what type of authentication is performed by default?
Kerberos Authentication
Enumeration through Microsoft Management Console
Microsoft Management Console
In this task, we will explore our first enumeration method, which is the only method that makes use of a GUI until the very last task. We will be using the Microsoft Management Console (MMC) with the Remote Server Administration Tools’ (RSAT) AD Snap-Ins. If you use the provided Windows VM (THMJMP1), it has already been installed for you. However, if you are using your own Windows machine, you can perform the following steps to install the Snap-Ins:
- Press Start
- Search “Apps & Features” and press enter
- Click Manage Optional Features
- Click Add a feature
- Search for “RSAT”
- Select “RSAT: Active Directory Domain Services and Lightweight Directory Tools” and click Install
You can start MMC by using the Windows Start button, searching run, and typing in MMC. If we just run MMC normally, it would not work as our computer is not domain-joined, and our local account cannot be used to authenticate to the domain.
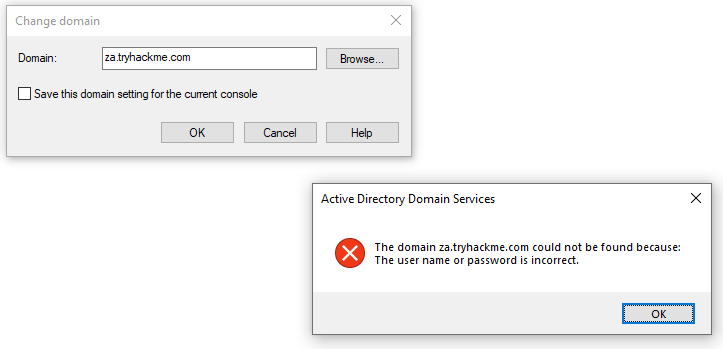
This is where the Runas window from the previous task comes into play. In that window, we can start MMC, which will ensure that all MMC network connections will use our injected AD credentials.
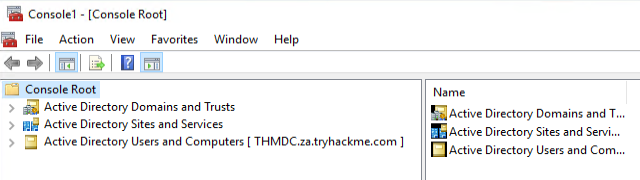
In MMC, we can now attach the AD RSAT Snap-In:
- Click File -> Add/Remove Snap-in
- Select and Add all three Active Directory Snap-ins
- Click through any errors and warnings
- Right-click on Active Directory Domains and Trusts and select Change Forest
- Enter za.tryhackme.com as the Root domain and Click OK
- Right-click on Active Directory Sites and Services and select Change Forest
- Enter za.tryhackme.com as the Root domain and Click OK
- Right-click on Active Directory Users and Computers and select Change Domain
- Enter za.tryhackme.com as the Domain and Click OK
- Right-click on Active Directory Users and Computers in the left-hand pane
- Click on View -> Advanced Features
If everything up to this point worked correctly, your MMC should now be pointed to, and authenticated against, the target Domain:
Users and Computers
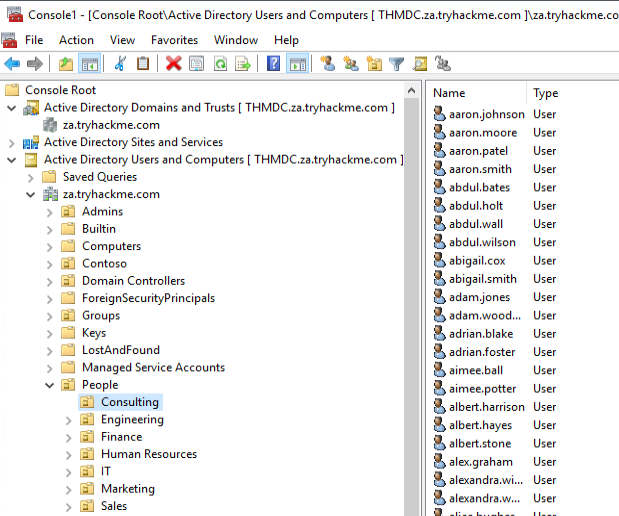
Let’s take a look at the Active Directory structure. For this task, we will focus on AD Users and Computers. Expand that snap-in and expand the za domain to see the initial Organisational Unit (OU) structure:

Let’s take a look at the People directory. Here we see that the users are divided according to department OUs. Clicking on each of these OUs will show the users that belong to that department.
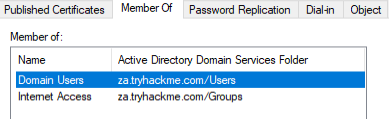
Clicking on any of these users will allow us to review all of their properties and attributes. We can also see what groups they are a member of:
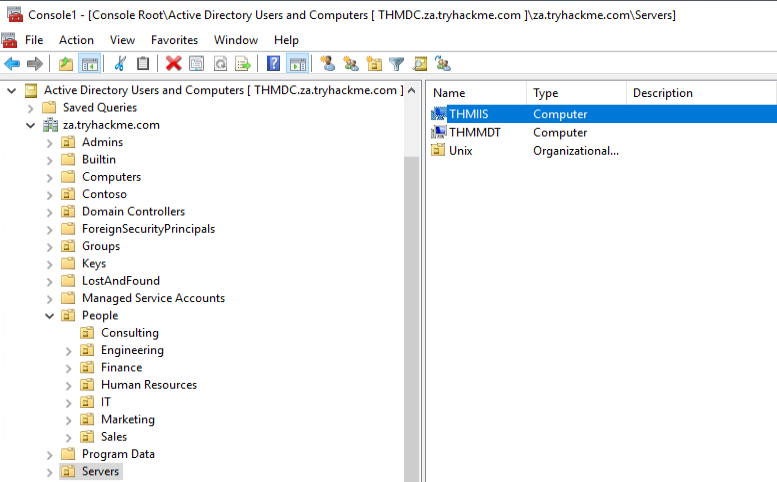
We can also use MMC to find hosts in the environment. If we click on either Servers or Workstations, the list of domain-joined machines will be displayed.
If we had the relevant permissions, we could also use MMC to directly make changes to AD, such as changing the user’s password or adding an account to a specific group. Play around with MMC to better understand the AD domain structure. Make use of the search feature to look for objects.
Benefits
- The GUI provides an excellent method to gain a holistic view of the AD environment.
- Rapid searching of different AD objects can be performed.
- It provides a direct method to view specific updates of AD objects.
- If we have sufficient privileges, we can directly update existing AD objects or add new ones.
Drawbacks
- The GUI requires RDP access to the machine where it is executed.
- Although searching for an object is fast, gathering AD wide properties or attributes cannot be performed.
How many Computer objects are part of the Servers OU?
2How many Computer objects are part of the Workstations OU?1How many departments (Organisational Units) does this organisation consist of?7How many Admin tiers does this organisation have?3What is the value of the flag stored in the description attribute of the t0_tinus.green account?THM{Enumerating.Via.MMC}
Enumeration through Command Promt
There are times when you just need to perform a quick and dirty AD lookup, and Command Prompt has your back. Good ol’ reliable CMD is handy when you perhaps don’t have RDP access to a system, defenders are monitoring for PowerShell use, and you need to perform your AD Enumeration through a Remote Access Trojan (RAT). It can even be helpful to embed a couple of simple AD enumeration commands in your phishing payload to help you gain the vital information that can help you stage the final attack.
CMD has a built-in command that we can use to enumerate information about AD, namely net. The net command is a handy tool to enumerate information about the local system and AD. We will look at a couple of interesting things we can enumerate from this position, but this is not an exhaustive list.
Note: For this task you will have to use THMJMP1 and won’t be able to use your own Windows VM. This will be explained in the drawbacks.
Users
We can use the net command to list all users in the AD domain by using the user sub-option:
1
2
3
4
5
6
7
8
9
10
11
12
13
14
15
16
C:\>net user /domain
The request will be processed at a domain controller for domain za.tryhackme.com

User accounts for \\THMDC

-------------------------------------------------------------------------------
aaron.conway             aaron.hancock            aaron.harris
aaron.johnson            aaron.lewis              aaron.moore
aaron.patel              aaron.smith              abbie.joyce
abbie.robertson          abbie.taylor             abbie.walker
abdul.akhtar             abdul.bates              abdul.holt
abdul.jones              abdul.wall               abdul.west
abdul.wilson             abigail.cox              abigail.cox1
abigail.smith            abigail.ward             abigail.wheeler
[....]
The command completed successfully.
This will return all AD users for us and can be helpful in determining the size of the domain to stage further attacks. We can also use this sub-option to enumerate more detailed information about a single user account:
1
2
3
4
5
6
7
8
9
10
11
12
13
14
15
16
17
18
19
20
21
22
23
24
25
26
27
28
C:\>net user zoe.marshall /domain
The request will be processed at a domain controller for domain za.tryhackme.com

User name                    zoe.marshall
Full Name                    Zoe Marshall
Comment
User's comment
Country/region code          000 (System Default)
Account active               Yes
Account expires              Never

Password last set            2/24/2022 10:06:06 PM
Password expires             Never
Password changeable          2/24/2022 10:06:06 PM
Password required            Yes
User may change password     Yes

Workstations allowed         All
Logon script
User profile
Home directory
Last logon                   Never

Logon hours allowed          All

Local Group Memberships
Global Group memberships     *Domain Users         *Internet Access
The command completed successfully.
Note: If the user is only part of a small number of AD groups, this command will be able to show us group memberships. However, usually, after more than ten group memberships, the command will fail to list them all.
Groups
We can use the net command to enumerate the groups of the domain by using the group sub-option:
1
2
3
4
5
6
7
8
9
10
11
12
13
14
15
16
17
18
19
20
C:\>net group /domain
The request will be processed at a domain controller for domain za.tryhackme.com

Group Accounts for \\THMDC

-------------------------------------------------------------------------------
*Cloneable Domain Controllers
*DnsUpdateProxy
*Domain Admins
*Domain Computers
*Domain Controllers
*Domain Guests
*Domain Users
[...]
*Schema Admins
*Server Admins
*Tier 0 Admins
*Tier 1 Admins
*Tier 2 Admins
The command completed successfully.
This information can help us find specific groups to target for goal execution. We could also enumerate more details such as membership to a group by specifying the group in the same command:
1
2
3
4
5
6
7
8
9
10
11
12
13
C:\>net group "Tier 1 Admins" /domain
The request will be processed at a domain controller for domain za.tryhackme.com

Group name     Tier 1 Admins
Comment

Members

-------------------------------------------------------------------------------
t1_arthur.tyler          t1_gary.moss             t1_henry.miller
t1_jill.wallis           t1_joel.stephenson       t1_marian.yates
t1_rosie.bryant
The command completed successfully.
Password Policy
We can use the net command to enumerate the password policy of the domain by using the accounts sub-option:
1
2
3
4
5
6
7
8
9
10
11
12
13
C:\>net accounts /domain
The request will be processed at a domain controller for domain za.tryhackme.com

Force user logoff how long after time expires?:       Never
Minimum password age (days):                          0
Maximum password age (days):                          Unlimited
Minimum password length:                              0
Length of password history maintained:                None
Lockout threshold:                                    Never
Lockout duration (minutes):                           30
Lockout observation window (minutes):                 30
Computer role:                                        PRIMARY
The command completed successfully.
This will provide us with helpful information such as:
- Length of password history kept. Meaning how many unique passwords must the user provide before they can reuse an old password.
- The lockout threshold for incorrect password attempts and for how long the account will be locked.
- The minimum length of the password.
- The maximum age that passwords are allowed to reach indicating if passwords have to be rotated at a regular interval.
This information can benefit us if we want to stage additional password spraying attacks against the other user accounts that we have now enumerated. It can help us better guess what single passwords we should use in the attack and how many attacks can we run before we risk locking accounts. However, it should be noted that if we perform a blind password spraying attack, we may lock out accounts anyway since we did not check to determine how many attempts that specific account had left before being locked.
You can find the full range of options associated with the net command here. Play around with these net commands to gather information about specific users and groups.
Benefits
- No additional or external tooling is required, and these simple commands are often not monitored for by the Blue team.
- We do not need a GUI to do this enumeration.
- VBScript and other macro languages that are often used for phishing payloads support these commands natively so they can be used to enumerate initial information regarding the AD domain before more specific payloads are crafted.
Drawbacks
- The
netcommands must be executed from a domain-joined machine. If the machine is not domain-joined, it will default to the WORKGROUP domain. - The
netcommands may not show all information. For example, if a user is a member of more than ten groups, not all of these groups will be shown in the output.
Apart from the Domain Users group, what other group is the aaron.harris account a member of?
Internet AccessIs the Guest account active? (Yay,Nay)NayHow many accounts are a member of the Tier 1 Admins group?7What is the account lockout duration of the current password policy in minutes?30
Enumeration through PowerShell
PowerShell
PowerShell is the upgrade of Command Prompt. Microsoft first released it in 2006. While PowerShell has all the standard functionality Command Prompt provides, it also provides access to cmdlets (pronounced command-lets), which are .NET classes to perform specific functions. While we can write our own cmdlets, like the creators of PowerView did, we can already get very far using the built-in ones.
Since we installed the AD-RSAT tooling in Task 3, it automatically installed the associated cmdlets for us. There are 50+ cmdlets installed. We will be looking at some of these, but refer to this list for the complete list of cmdlets.
Using our SSH terminal, we can upgrade it to a PowerShell terminal using the following command: powershell.
Users
We can use the Get-ADUser cmdlet to enumerate AD users:
1
2
3
4
5
6
7
8
9
10
11
12
PS C:\> Get-ADUser -Identity gordon.stevens -Server za.tryhackme.com -Properties *

AccountExpirationDate                :
accountExpires                       : 9223372036854775807
AccountLockoutTime                   :
[...]
Deleted                              :
Department                           : Consulting
Description                          :
DisplayName                          : Gordon Stevens
DistinguishedName                    : CN=gordon.stevens,OU=Consulting,OU=People,DC=za,DC=tryhackme,DC=com
[...]
The parameters are used for the following:
-Identity- The account name that we are enumerating-Properties- Which properties associated with the account will be shown, * will show all properties-Server- Since we are not domain-joined, we have to use this parameter to point it to our domain controller
For most of these cmdlets, we can also use the -Filter parameter that allows more control over enumeration and use the Format-Table cmdlet to display the results such as the following neatly:
1
2
3
4
5
6
7
8
9
PS C:\> Get-ADUser -Filter 'Name -like "*stevens"' -Server za.tryhackme.com | Format-Table Name,SamAccountName -A

Name             SamAccountName
----             --------------
chloe.stevens    chloe.stevens
samantha.stevens samantha.stevens
[...]
janice.stevens   janice.stevens
gordon.stevens   gordon.stevens
Groups
We can use the Get-ADGroup cmdlet to enumerate AD groups:
1
2
3
4
5
6
7
8
9
10
11
PS C:\> Get-ADGroup -Identity Administrators -Server za.tryhackme.com


DistinguishedName : CN=Administrators,CN=Builtin,DC=za,DC=tryhackme,DC=com
GroupCategory     : Security
GroupScope        : DomainLocal
Name              : Administrators
ObjectClass       : group
ObjectGUID        : f4d1cbcd-4a6f-4531-8550-0394c3273c4f
SamAccountName    : Administrators
SID               : S-1-5-32-544
We can also enumerate group membership using the Get-ADGroupMember cmdlet:
1
2
3
4
5
6
7
8
9
10
11
12
13
14
15
16
17
PS C:\> Get-ADGroupMember -Identity Administrators -Server za.tryhackme.com


distinguishedName : CN=Domain Admins,CN=Users,DC=za,DC=tryhackme,DC=com

name              : Domain Admins
objectClass       : group
objectGUID        : 8a6186e5-e20f-4f13-b1b0-067f3326f67c
SamAccountName    : Domain Admins
SID               : S-1-5-21-3330634377-1326264276-632209373-512

[...]

distinguishedName : CN=Administrator,CN=Users,DC=za,DC=tryhackme,DC=com name              : Administrator
objectClass       : user
objectGUID        : b10fe384-bcce-450b-85c8-218e3c79b30fSamAccountName    : Administrator
SID               : S-1-5-21-3330634377-1326264276-632209373-500
AD Objects
A more generic search for any AD objects can be performed using the Get-ADObject cmdlet. For example, if we are looking for all AD objects that were changed after a specific date:
1
2
3
4
5
6
7
8
9
10
11
12
13
14
PS C:\> $ChangeDate = New-Object DateTime(2022, 02, 28, 12, 00, 00)
PS C:\> Get-ADObject -Filter 'whenChanged -gt $ChangeDate' -includeDeletedObjects -Server za.tryhackme.com

Deleted           :
DistinguishedName : DC=za,DC=tryhackme,DC=com
Name              : za
ObjectClass       : domainDNS
ObjectGUID        : 518ee1e7-f427-4e91-a081-bb75e655ce7a

Deleted           :
DistinguishedName : CN=Administrator,CN=Users,DC=za,DC=tryhackme,DC=com
Name              : Administrator
ObjectClass       : user
ObjectGUID        : b10fe384-bcce-450b-85c8-218e3c79b30f
If we wanted to, for example, perform a password spraying attack without locking out accounts, we can use this to enumerate accounts that have a badPwdCount that is greater than 0, to avoid these accounts in our attack:
1
2
PS C:\> Get-ADObject -Filter 'badPwdCount -gt 0' -Server za.tryhackme.com
PS C:\>
This will only show results if one of the users in the network mistyped their password a couple of times.
Domains
We can use Get-ADDomain to retrieve additional information about the specific domain:
1
2
3
4
5
6
7
8
9
10
11
PS C:\> Get-ADDomain -Server za.tryhackme.com

AllowedDNSSuffixes                 : {}
ChildDomains                       : {}
ComputersContainer                 : CN=Computers,DC=za,DC=tryhackme,DC=com
DeletedObjectsContainer            : CN=Deleted Objects,DC=za,DC=tryhackme,DC=com
DistinguishedName                  : DC=za,DC=tryhackme,DC=com
DNSRoot                            : za.tryhackme.com
DomainControllersContainer         : OU=Domain Controllers,DC=za,DC=tryhackme,DC=com
[...]
UsersContainer                     : CN=Users,DC=za,DC=tryhackme,DC=com
Altering AD Objects
The great thing about the AD-RSAT cmdlets is that some even allow you to create new or alter existing AD objects. However, our focus for this network is on enumeration. Creating new objects or altering existing ones would be considered AD exploitation, which is covered later in the AD module.
However, we will show an example of this by force changing the password of our AD user by using the Set-ADAccountPassword cmdlet:
1
PS C:\> Set-ADAccountPassword -Identity gordon.stevens -Server za.tryhackme.com -OldPassword (ConvertTo-SecureString -AsPlaintext "old" -force) -NewPassword (ConvertTo-SecureString -AsPlainText "new" -Force)
Remember to change the identity value and password for the account you were provided with for enumeration on the distributor webpage in Task 1.
Benefits
- The PowerShell cmdlets can enumerate significantly more information than the net commands from Command Prompt.
- We can specify the server and domain to execute these commands using runas from a non-domain-joined machine.
- We can create our own cmdlets to enumerate specific information.
- We can use the AD-RSAT cmdlets to directly change AD objects, such as resetting passwords or adding a user to a specific group.
Benefits
- PowerShell is often monitored more by the blue teams than Command Prompt.
- We have to install the AD-RSAT tooling or use other, potentially detectable, scripts for PowerShell enumeration.
1
PS C:\Users\leslie.young> Get-ADUser -Identity beth.nolan -Server za.tryhackme.com -Properties *
What is the value of the Title attribute of Beth Nolan (beth.nolan)?
Senior
1
PS C:\Users\leslie.young> Get-ADUser -Identity annette.manning -Server za.tryhackme.com -Properties *
What is the value of the DistinguishedName attribute of Annette Manning (annette.manning)?
CN=annette.manning,OU=Marketing,OU=People,DC=za,DC=tryhackme,DC=com
When was the Tier 2 Admins group created?
2/24/2022 10:04:41 PM
What is the value of the SID attribute of the Enterprise Admins group?
S-1-5-21-3330634377-1326264276-632209373-519
Which container is used to store deleted AD objects?
CN=Deleted Objects,DC=za,DC=tryhackme,DC=com
Enumeration through Bloodhound
Lastly, we will look at performing AD enumeration using Bloodhound. Bloodhound is the most powerful AD enumeration tool to date, and when it was released in 2016, it changed the AD enumeration landscape forever.
Bloodhound History
For a significant amount of time, red teamers (and, unfortunately, attackers) had the upper hand. So much so that Microsoft integrated their own version of Bloodhound in its Advanced Threat Protection solution. It all came down to the following phrase:
“Defenders think in lists, Attackers think in graphs.” - Unknown
Bloodhound allowed attackers (and by now defenders too) to visualise the AD environment in a graph format with interconnected nodes. Each connection is a possible path that could be exploited to reach a goal. In contrast, the defenders used lists, like a list of Domain Admins or a list of all the hosts in the environment.
This graph-based thinking opened up a world to attackers. It allowed for a two-stage attack. In the first stage, the attackers would perform phishing attacks to get an initial entry to enumerate AD information. This initial payload was usually incredibly noisy and would be detected and contained by the blue team before the attackers could perform any actions apart from exfiltrating the enumerated data. However, the attackers could now use this data offline to create an attack path in graph format, showing precisely the steps and hops required. Using this information during the second phishing campaign, the attackers could often reach their goal in minutes once a breach was achieved. It is often even faster than it would take the blue team to receive their first alert. This is the power of thinking in graphs, which is why so many blue teams have also started to use these types of tools to understand their security posture better.
Sharphound
You will often hear users refer to Sharphound and Bloodhound interchangeably. However, they are not the same. Sharphound is the enumeration tool of Bloodhound. It is used to enumerate the AD information that can then be visually displayed in Bloodhound. Bloodhound is the actual GUI used to display the AD attack graphs. Therefore, we first need to learn how to use Sharphound to enumerate AD before we can look at the results visually using Bloodhound.
There are three different Sharphound collectors:
- Sharphound.ps1 - PowerShell script for running Sharphound. However, the latest release of Sharphound has stopped releasing the Powershell script version. This version is good to use with RATs since the script can be loaded directly into memory, evading on-disk AV scans.
- Sharphound.exe - A Windows executable version for running Sharphound.
- AzureHound.ps1 - PowerShell script for running Sharphound for Azure (Microsoft Cloud Computing Services) instances. Bloodhound can ingest data enumerated from Azure to find attack paths related to the configuration of Azure Identity and Access Management.
Note: Your Bloodhound and Sharphound versions must match for the best results. Usually there are updates made to Bloodhound which means old Sharphound results cannot be ingested. This network was created using Bloodhound v4.1.0. Please make sure to use this version with the Sharphound results.
When using these collector scripts on an assessment, there is a high likelihood that these files will be detected as malware and raise an alert to the blue team. This is again where our Windows machine that is non-domain-joined can assist. We can use the runas command to inject the AD credentials and point Sharphound to a Domain Controller. Since we control this Windows machine, we can either disable the AV or create exceptions for specific files or folders, which has already been performed for you on the THMJMP1 machine. You can find the Sharphound binaries on this host in the C:\Tools\ directory. We will use the SharpHound.exe version for our enumeration, but feel free to play around with the other two. We will execute Sharphound as follows:
1
Sharphound.exe --CollectionMethods <Methods> --Domain za.tryhackme.com --ExcludeDCs
Parameters explained:
- CollectionMethods - Determines what kind of data Sharphound would collect. The most common options are Default or All. Also, since Sharphound caches information, once the first run has been completed, you can only use the Session collection method to retrieve new user sessions to speed up the process.
- Domain - Here, we specify the domain we want to enumerate. In some instances, you may want to enumerate a parent or other domain that has trust with your existing domain. You can tell Sharphound which domain should be enumerated by altering this parameter.
- ExcludeDCs -This will instruct Sharphound not to touch domain controllers, which reduces the likelihood that the Sharphound run will raise an alert. You can find all the various Sharphound parameters here. It is good to overview the other parameters since they may be required depending on your red team assessment circumstances.
Using your SSH PowerShell session from the previous task, copy the Sharphound binary to your AD user’s Documents directory:
1
2
3
PS C:\> copy C:\Tools\Sharphound.exe ~\Documents\
PS C:\> cd ~\Documents\
PS C:\Users\gordon.stevens\Documents>
We will run Sharphound using the All and Session collection methods:
1
2
3
4
5
6
7
8
9
10
11
PS C:\Users\gordon.stevens\Documents\>SharpHound.exe --CollectionMethods All --Domain za.tryhackme.com --ExcludeDCs
2022-03-16T19:11:41.2898508+00:00|INFORMATION|Resolved Collection Methods: Group, LocalAdmin, GPOLocalGroup, Session, LoggedOn, Trusts, ACL, Container, RDP, ObjectProps, DCOM, SPNTargets, PSRemote
2022-03-16T19:11:41.3056683+00:00|INFORMATION|Initializing SharpHound at 7:11 PM on 3/16/2022
2022-03-16T19:11:41.6648113+00:00|INFORMATION|Flags: Group, LocalAdmin, GPOLocalGroup, Session, LoggedOn, Trusts, ACL, Container, RDP, ObjectProps, DCOM, SPNTargets, PSRemote
2022-03-16T19:11:41.8211318+00:00|INFORMATION|Beginning LDAP search for za.tryhackme.com
[....]
2022-03-16T19:12:31.6981568+00:00|INFORMATION|Output channel closed, waiting for output task to complete
Closing writers
2022-03-16T19:12:32.2605943+00:00|INFORMATION|Status: 2163 objects finished (+2163 43.26)/s -- Using 85 MB RAM
2022-03-16T19:12:32.2605943+00:00|INFORMATION|Enumeration finished in 00:00:50.4369344
2022-03-16T19:12:32.5418517+00:00|INFORMATION|SharpHound Enumeration Completed at 7:12 PM on 3/16/2022! Happy Graphing!
It will take about 1 minute for Sharphound to perform the enumeration. In larger organisations, this can take quite a bit longer, even hours to execute for the first time. Once completed, you will have a timestamped ZIP file in the same folder you executed Sharphound from.
1
2
3
4
5
6
7
8
9
PS C:\Users\gordon.stevens\Documents> dir

    Directory: C:\Users\gordon.stevens\Documents

Mode                LastWriteTime         Length Name
----                -------------         ------ ----
-a----        3/16/2022   7:12 PM         121027 20220316191229_BloodHound.zip
-a----        3/16/2022   5:19 PM         906752 SharpHound.exe
-a----        3/16/2022   7:12 PM         360355 YzE4MDdkYjAtYjc2MC00OTYyLTk1YTEtYjI0NjhiZmRiOWY1.bin
Bloodhound
As mentioned before, Bloodhound is the GUI that allows us to import data captured by Sharphound and visualise it into attack paths. Bloodhound uses Neo4j as its backend database and graphing system. Neo4j is a graph database management system. If you’re using the AttackBox, you may use the red Bloodhound icon in the Dock to launch it. In all other cases, make sure Bloodhound and neo4j are installed and configured on your attacking machine. Either way, it is good to understand what happens in the background. Before we can start Bloodhound, we need to load Neo4j:
1
2
3
4
5
6
7
8
9
10
11
12
13
14
thm@thm:~# neo4j console start
Active database: graph.db
Directories in use:
  home:         /var/lib/neo4j
  config:       /etc/neo4j
  logs:         /var/log/neo4j
  plugins:      /var/lib/neo4j/plugins
  import:       /var/lib/neo4j/import
  data:         /var/lib/neo4j/data
  certificates: /var/lib/neo4j/certificates
  run:          /var/run/neo4j
Starting Neo4j.
[....]
2022-03-13 19:59:18.014+0000 INFO  Bolt enabled on 127.0.0.1:7687.
In another Terminal tab, run bloodhound --no-sandbox. This will show you the authentication GUI:
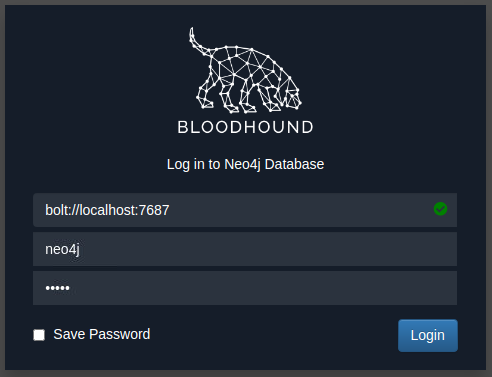
The default credentials for the neo4j database will be neo4j:neo4j. Use this to authenticate in Bloodhound. To import our results, you will need to recover the ZIP file from the Windows host. The simplest way is to use SCP command on your AttackBox:
1
scp <AD Username>@THMJMP1.za.tryhackme.com:C:/Users/<AD Username>/Documents/<Sharphound ZIP> .
Once you provide your password, this will copy the results to your current working directory. Drag and drop the ZIP file onto the Bloodhound GUI to import into Bloodhound. It will show that it is extracting the files and initiating the import.

Once all JSON files have been imported, we can start using Bloodhound to enumerate attack paths for this specific domain.
Attack Paths
There are several attack paths that Bloodhound can show. Pressing the three stripes next to “Search for a node” will show the options. The very first tab shows us the information regarding our current imports.
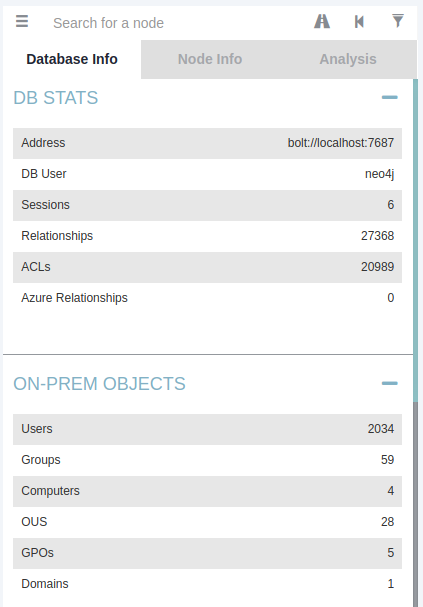
Note that if you import a new run of Sharphound, it would cumulatively increase these counts. First, we will look at Node Info. Let’s search for our AD account in Bloodhound. You must click on the node to refresh the view. Also note you can change the label scheme by pressing LeftCtrl.

We can see that there is a significant amount of information returned regarding our use. Each of the categories provides the following information:
- Overview - Provides summaries information such as the number of active sessions the account has and if it can reach high-value targets.
- Node Properties - Shows information regarding the AD account, such as the display name and the title.
- Extra Properties - Provides more detailed AD information such as the distinguished name and when the account was created.
- Group Membership - Shows information regarding the groups that the account is a member of.
- Local Admin Rights - Provides information on domain-joined hosts where the account has administrative privileges.
- Execution Rights - Provides information on special privileges such as the ability to RDP into a machine.
- Outbound Control Rights - Shows information regarding AD objects where this account has permissions to modify their attributes.
- Inbound Control Rights - Provides information regarding AD objects that can modify the attributes of this account.
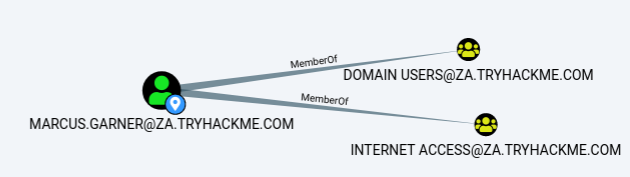
If you want more information in each of these categories, you can press the number next to the information query. For instance, let’s look at the group membership associated with our account. By pressing the number next to “First Degree Group Membership”, we can see that our account is a member of two groups.
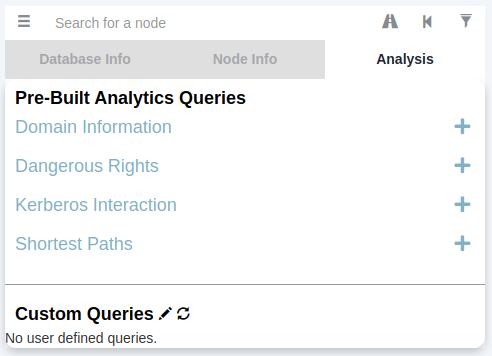
Next, we will be looking at the Analysis queries. These are queries that the creators of Bloodhound have written themselves to enumerate helpful information.
Under the Domain Information section, we can run the Find all Domain Admins query. Note that you can press LeftCtrl to change the label display settings.
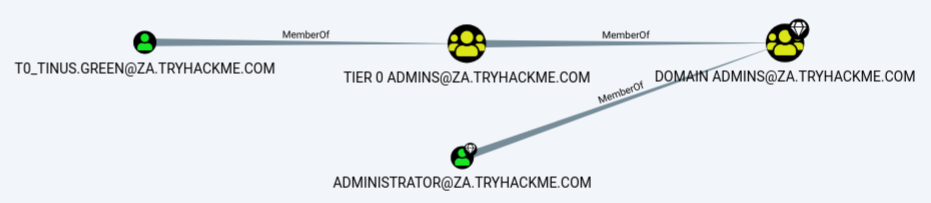
The icons are called nodes, and the lines are called edges. Let’s take a deeper dive into what Bloodhound is showing us. There is an AD user account with the username of T0_TINUS.GREEN, that is a member of the group Tier 0 ADMINS. But, this group is a nested group into the DOMAIN ADMINS group, meaning all users that are part of the Tier 0 ADMINS group are effectively DAs.
Furthermore, there is an additional AD account with the username of ADMINISTRATOR that is part of the DOMAIN ADMINS group. Hence, there are two accounts in our attack surface that we can probably attempt to compromise if we want to gain DA rights. Since the ADMINISTRATOR account is a built-in account, we would likely focus on the user account instead.
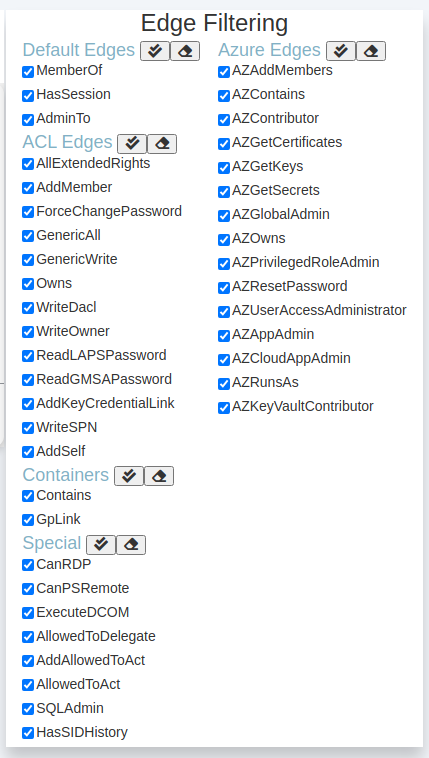
Each AD object that was discussed in the previous tasks can be a node in Bloodhound, and each will have a different icon depicting the type of object it is. If we want to formulate an attack path, we need to look at the available edges between the current position and privileges we have and where we want to go. Bloodhound has various available edges that can be accessed by the filter icon:
These are also constantly being updated as new attack vectors are discovered. We will be looking at exploiting these different edges in a future network. However, let’s look at the most basic attack path using only the default and some special edges. We will run a search in Bloodhound to enumerate the attack path. Press the path icon to allow for path searching.

Our Start Node would be our AD username, and our End Node will be the Tier 1 ADMINS group since this group has administrative privileges over servers.
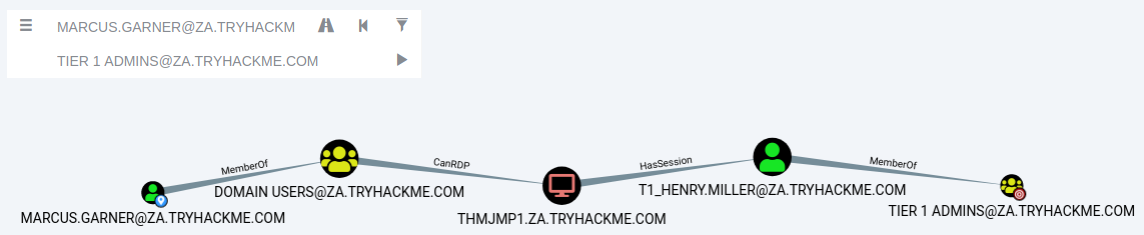
If there is no available attack path using the selected edge filters, Bloodhound will display “No Results Found”. Note, this may also be due to a Bloodhound/Sharphound mismatch, meaning the results were not properly ingested. Please make use of Bloodhound v4.1.0. However, in our case, Bloodhound shows an attack path. It shows that one of the T1 ADMINS, ACCOUNT, broke the tiering model by using their credentials to authenticate to THMJMP1, which is a workstation. It also shows that any user that is part of the DOMAIN USERS group, including our AD account, has the ability to RDP into this host.
We could do something like the following to exploit this path:
- Use our AD credentials to RDP into THMJMP1.
- Look for a privilege escalation vector on the host that would provide us with Administrative access.
- Using Administrative access, we can use credential harvesting techniques and tools such as Mimikatz.
- Since the T1 Admin has an active session on THMJMP1, our credential harvesting would provide us with the NTLM hash of the associated account.
This is a straightforward example. The attack paths may be relatively complex in normal circumstances and require several actions to reach the final goal. If you are interested in the exploits associated with each edge, the following Bloodhound documentation provides an excellent guide. Bloodhound is an incredibly powerful AD enumeration tool that provides in-depth insights into the AD structure of an attack surface. It is worth the effort to play around with it and learn its various features.
Session Data Only
The structure of AD does not change very often in large organisations. There may be a couple of new employees, but the overall structure of OUs, Groups, Users, and permission will remain the same. However, the one thing that does change constantly is active sessions and LogOn events. Since Sharphound creates a point-in-time snapshot of the AD structure, active session data is not always accurate since some users may have already logged off their sessions or new users may have established new sessions. This is an essential thing to note and is why we would want to execute Sharphound at regular intervals.
A good approach is to execute Sharphound with the “All” collection method at the start of your assessment and then execute Sharphound at least twice a day using the “Session” collection method. This will provide you with new session data and ensure that these runs are faster since they do not enumerate the entire AD structure again. The best time to execute these session runs is at around 10:00, when users have their first coffee and start to work and again around 14:00, when they get back from their lunch breaks but before they go home.
You can clear stagnant session data in Bloodhound on the Database Info tab by clicking the “Clear Session Information” before importing the data from these new Sharphound runs.
Benefits
- Provides a GUI for AD enumeration.
- Has the ability to show attack paths for the enumerated AD information.
- Provides more profound insights into AD objects that usually require several manual queries to recover.
Drawbacks
- Requires the execution of Sharphound, which is noisy and can often be detected by AV or EDR solutions.
What command can be used to execute Sharphound.exe and request that it recovers Session information only from the za.tryhackme.com domain without touching domain controllers?
SharpHound.exe --CollectionMethods All --Domain za.tryhackme.com --ExcludeDCs
Apart from the krbtgt account, how many other accounts are potentially kerberoastable?
4
How many machines do members of the Tier 1 Admins group have administrative access to?
2
How many users are members of the Tier 2 Admins group?
15
Conclusion
Enumerating AD is a massive task. Proper AD enumeration is required to better understand the structure of the domain and determine attack paths that can be leveraged to perform privilege escalation or lateral movement.
Additional Enumeration Techniques
In this network, we covered several techniques that can be used to enumerate AD. This is by no means an exhaustive list. Here is a list of enumeration techniques that also deserve mention:
- LDAP enumeration - Any valid AD credential pair should be able to bind to a Domain Controller’s LDAP interface. This will allow you to write LDAP search queries to enumerate information regarding the AD objects in the domain.
- PowerView - PowerView is a recon script part of the PowerSploit project. Although this project is no longer receiving support, scripts such as PowerView can be incredibly useful to perform semi-manual enumeration of AD objects in a pinch.
- Windows Management Instrumentation (WMI) - WMI can be used to enumerate information from Windows hosts. It has a provider called “root\directory\ldap” that can be used to interact with AD. We can use this provider and WMI in PowerShell to perform AD enumeration.
We should also note that this room focussed on enumerating the structure of the AD domain in its entirety instead of concentrating only on identifying misconfigurations and weaknesses. Enumeration focused on identifying weaknesses, such as insecure shares or breaks in the tiering model, will be discussed in future rooms.
Mitigations
AD enumeration is incredibly hard to defend against. Many of these techniques mimic regular network traffic and behaviour, making it difficult to distinguish malicious traffic from normal traffic. However, there are a couple of things that we can do to detect potentially malicious behaviour:
- Powerful AD enumeration techniques such as Sharphound generate a significant amount of LogOn events when enumerating session information. Since it executes from a single AD account, these LogOn events will be associated with this single account. We can write detection rules to detect this type of behaviour if it occurs from a user account.
- We can write signature detection rules for the tools that must be installed for specific AD enumeration techniques, such as the SharpHound binaries and the AD-RSAT tooling.
- Unless used by employees of our organisation, we can monitor the use of Command Prompt and Powershell in our organisation to detect potential enumeration attempts from unauthorised sources.
On a side note, the blue team themselves can also regularly use these enumeration techniques to identify gaps and misconfigurations in the structure of the AD domain. If we can resolve these misconfigurations, even if an attacker enumerates our AD, they would not be able to find misconfigurations that can be exploited for privilege escalation or lateral movement.
Now that we have enumerated AD, the next step is to perform privilege escalation and lateral movement across the domain to get into a suitable position to stage attacks. This will be covered in the next room.